

|
RESTORATION PART 5

By Skip Cain
We've all seen some really good looking cars,with shiny new paint and interiors, at shows and cruise ins. But why is the hood closed? If you're like me, and ask the owner to pop the hood, you instantly see why. The engine and underhood compartment look every bit of 20-30 years old. Dirt and grease, rust, faded and flaking paint. Sound familiar? Want to do something about it? You'll have to invest in some time and work, but the results will be worth it. You'll no longer have to keep the hood closed, as a matter of fact, you'll proudly have that hood up, for all to see. Let's get started.
These tips are intended for Chevelle owners, but results will be similar for all A- body cars (except for engine paint color.)
The first order of business is to get the engine and engine compartment as clean and as free of dirt and grease as possible. A good product to use for this is some purple stuff called SuperClean, by Castrol.This product, plus a high pressure washer will really help get it clean. Now you're ready to pull the engine to get the best results. It really is easier to do this job right if you pull the engine, but satisfactory results can be had if you take off all the accessories and leave it in. I'm going to proceed as if the engine has been pulled.
After the engine is out of the compartment, you'll be able to get to all areas , including the crossmember, or cradle of the frame. Now you can sand off the scale and rust, as well as the firewall and inner fenders. If you sand down to bare metal, you should use a primer on the metal. I'm keeping this within the budget for the average do-it-yourselfer, so a enamel spraycan primer such as Krylon's red oxide will suffice. This is best on metal only, so don't use this on plastic inner fenders. After the firewall, and steel inner fenders are done, topcoat with either GM recondition black (you'll have to use a spraygun for this) or Eastwood's Underhood Black. I've found these are the closest match to the original semigloss black that the factory used. For the frame, I recommend POR 15, a coating that you can brush on to the bare metal frame. This will dry to a non porous, hard, durable and almost bulletproof finish with no brush marks. It's available in either the correct semigloss, or gloss black finish. A quart will be more than enough for the job. Another pretty good product to use is Chassis Black by Eastwood Co. It's a spraycan epoxy enamel, which is tougher than regular enamel, but not as tough or durable as POR.
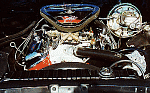
Now you can turn your attention to the engine and engine accessories. After it is degreased and clean, remove the exhaust manifolds, all pumps, compressors, brackets pulleys, carburetor, etc. You want the engine stripped of everything, then mask off the exhaust and intake ports, as well as fuel pump inlet. You want to remove as much rust and scale, flaking paint, etc. as possible. Use a wire brush or a small grinder for this. Remember, the more you remove the better the end results will be. The pulleys, brackets, PS pump, AC compressor and other accessories will also need to be sanded smooth, or better yet, beadblasted. The exhaust manifolds should be sandblasted to get all the rust out of the pitted areas.(If you have headers, invest in having them ceramic coated. This is the only thing I know of that will keep headers looking good.) Exhaust manifolds can be coated with a high heat gray paint that duplicates cast iron color. I use the POR brand, but Eastwood and Bill Hirsh sell a similar product. I've found that no matter how well the exhaust manifolds were blasted(sand or aluminum oxide) and coated (new, fresh out of the can) rust still wants to comes back. I was told to bake the freshly blasted manifolds in the oven before painting, but I haven't tried that. The idea is to burn off any moisture that might be lurking in the pits of the cast iron. I have seen that Jet Hot coatings now offers a cast gray color. A friend of mine had his manifolds done three years ago, and they still look good, so that's the way to go if you want to spend the bucks.
I've used Plasti-kote engine enamel in spray cans with good results. It has a 500 degree temperature rating and is fairly durable. It sprays on thin, so use three light coats to avoid runs. You should use the gray primer before topcoating with Chevy orange.
The rest of the underhood items need to be topcoated in the correct finish. This list of items is an approximate correct finish guide. Some cars on the east coast were finished differently from west coast cars, and variances occurred from plant to plant. This list is a guide based on my experience in owning , showing and judging Chevelles over the years. I am not getting into factory overspray , inspection marks, paint runs, etc. Just because factory workers did a sloppy job, doesn't mean we have to also.

- frame and upper/lower control arms and upper shafts-semigloss black
- front coil springs-gloss black or natural(better detail contrast)
- firewall, inner fenders, radiator support-semigloss black
- radiator and fan-gloss black
- fan clutch-natural aluminum
- radiator shroud-natural black plastic or gloss black
- steering box-natural cast iron gray
- steering linkage-natural steel
- front sway bar-natural cast iron gray
- heater or AC housing-semigloss black
- hood hinges, latch, catch and springs- gray phosphate plated
- brackets and steel pulleys-semi gloss or gloss black(gloss gives more detail contrast)
- cast iron pulleys- natural cast iron
- master cylinder- natural cast iron(some use gloss black)
- brake booster-gold cadmium plated(master cylinder lid also)
- windshield wiper motor-gloss black
- alternator- natural aluminum
- power steering pump-gloss black
- AC compressor-semigloss black
- steering column shaft-natural steel
- horns- gloss black
- coil- gloss black
- voltage regulator-gloss black
- distributor- natural aluminum with gloss black cap
- fuel and brake lines-natural steel
The Eastwood Company (www.eastwoodco.com) markets some very good detail paints available in spraycan or quarts of ready to spray. Spray gray is good for a natural cast iron appearance, and I use it to duplicate phosphate gray hood hinges and springs. Detail gray is good to use for the appearance of natural steel.Aluma blast gives a finish of freshly bead blasted aluminum. I have experimented with clearcoating bare metal, but the appearance was either too glossy, or the clearcoat was too porous, and allowed rust to start forming. I have found it is more durable to refinish bare metal parts with primer and topcoat with these Eastwood products.Their Corroless product is excellent for use as a primer and rust inhibitor.It is worth the money.
Your undercarriage should also be cleaned and degreased first. This includes removing any undercoating from floorpans, frame, and gastank. There is no easy way to do this.A scraper, some lacquer thinner, and a lot of elbow grease is required. This is the nastiest part of the job, and repeated scraping and wiping with lacquer thinner will eventually clean it up. Be sure to have plenty of rags available.
When you finally have all the undercoating removed, sand out any rusty or flaky areas until they are smooth and prime any bare metal areas. The factories used a dark gray to black finish on the floorpans. I've had good results using either the GM recondition black, or Eastwood's underhood black on the floorpans. The frame should be painted a semigloss black, and I recommend the POR for maximum durability. A second choice would be the Chassis black by Eastwood. To paint the top of the frame you can remove the body bushing bolts one side at a time and jack the body up using the floorpan supports and a length of 2x4. This is also a good time to replace those worn and dry rotted rubber bushings with a set of polygraphite bushings from PST.Be careful not to break the bushing bolts if they are rusted.

The rest of the undercarriage components are painted as follows: These varied from plant to plant and this is a basic acceptable guide. Again, I'm not getting into bellhousing overspray, driveshaft stripes, transmission inspection marks or stamps,etc. which is for over restored concours type trailer queens.
- transmission-natural aluminum
- bellhousing-natural aluminum
- transmission support- semigloss black
- driveshaft- natural steel
- rear axle-semigloss black
- rear swaybar-semigloss black
- rear coil springs-gloss black
- rear control arms-semigloss black
- gas tank-natural steel(shiny)
- gas tank straps-gloss black
- parking brake cables-natural steel
Finally you'll want to get rid of those rusty exhaust pipes, mufflers, hangers and clamps.Replace with aluminized steel pipes and mufflers that are coated inside as well as outside. This will prevent the rust from forming inside and eating through. Stainless steel exhaust systems are expensive, and they tend to get a bluish look to them after a while. Using stainless steel muffler clamps keeps them rust free, but they aren't as strong as regular steel, and shouldn't be used to crimp the pipe, because they'll break. Use a regular steel clamp to crimp and then install the stainless ones.
 At this point you should be looking pretty good. You'll have to resist the urge to go out and buy a lot of mirrors to place under your car for the next show.
Go ahead, show it off, and keep your hood high.