
|
Materials #1
Paints and Primers
Authored by Wes Vann, last revised on April 12, 1997
PLEASE NOTE; I'm not a professional painter (although I've painted several cars during my lengthy years). Some of the information is the result of products that I have personally used. The remainder is from persons that I feel are qualified to give honest, unbiased data.
Most of the products listed are from PPG. There are only a few companies that produce quality automotive paint products. There is Dupont, Sikkens, and also a German manufacturer whose name evades me right now. (for a latter revision)
Regardless of the manufacturer that you chose, stick with that manufacturer!!!!
It's a requirement that any time that you spray paint, you wear a filtering mask. With certain paint products, it's also recommended that you have some form of skin protection.
Due to changing environmental regulations, the availability of certain products may be limited or even illegal. New products are released to replace the outlawed ones.
Any input is welcome!
MAJOR POINT #1!! Except as noted, all primer is porous! Bondo is porous! Spot putty is porous!
The reason for playing this up is that any porous material can, and will, soak up oil and water. It's possible for water to get through the primer and rust the metal below. One source of oil that isn't always thought about is from your hands. (during wet-sanding I tend to not worry about oil from my hands due to them getting dryed out, however, I've ended up with fish-eyes due to when carrying the object, I rested it against my chest)
MAJOR POINT #2!! Everything shrinks over time! Bondo shrinks, primer shrinks. The thicker the bondo, the worse the problem. Even a thick primer (such as K200) will shrink and if the thickness varies greatly, you may notice a wave in the paint a month after being done. I like to let the K200 set for a week prior to doing the final sanding.
SEVERAL GENERAL TERMS (currently not in any certain order)
"HVLP" This is a new type of spray gun and the letters stand for "high volume, low pressure". The idea is that more of the paint goes on the car and not into the spray booths filters. It's a good idea that seems to be resisted just due to the cost for new equipment and familiarity with the old style guns. Here in L.A., they are required by law in a production shop.
"SINGLE STAGE PAINT" This is where there isn't a clear coat added over the color coat. It's not as costly, however it doesn't have as much luster and metallics tend to fade faster. When the paint is mixed, there is more clear added to the mixture.
"BC/CC" This is a two stage paint and the letters stand for "base coat/clear coat". You will get more luster and less fading. As you could guess, first the color is sprayed, and then top coated with a clear.
"HIGH SOLIDS" Solids are the part of the paint that remains after the chemicals evaporate.
"PEARLS" A pearl is an additive that is added to the clear coat. It gives a reflective quality just like a pearl. The color of the pearl doesn't have to be the same as the base color. As a result you could create things like ghost flames that are only visible when the light hits it just right. It's real difficult to get good results spraying pearls due to the fact the amount of clear/pearl that is sprayed controls the amount of the reflective quality. It's not something that may be visible while spraying.
"RUSTOLEUM" (I had to put this somewhere) This is a great paint for rust control on your lawn chairs! Don't use it on your car. From what I understand, the reason that this product works so good is that it has a fish oil base. As a result, you will never get another automotive paint to flow correctly over it.
"ORANGEPEEL" Just like the name would imply, this describes the surface texture of the paint. Basically, it's due to the paint not flowing prior to taking a set. Painting is a trick due to it being a balance between getting runs and ending up with orangepeel.
"FISHEYES" This is where the paint looks like somebody jabbed at your paint with a pin.The main reason is due to there being oil on the surface painted. It could something as simple as oil from your hands when you leaned on the car. You should always wipe the car down with a wax remover. (PPG DX330) There are additives that can be added to help prevent fisheyes however, they also increase the probabilities of getting runs.
"HARDENERS AND CATALYSTS" There are several additives that can be added to paint that will cause the paint to set-up faster, have more luster, etc. It's very highly recommended that you stick with one manufacturer's product line!
LEAD FILLERS;
Back in the good old days (??) seams were filled with lead. This would more accurately refered to as solder due to it being a combination of tin and lead. It requires a coating of tinning flux that if not neutralized will seep out of the gaps and ruin a paint job. Lead is toxic and can lead poisoning! One of the nice things about lead is that it will not shrink.
BONDO AND PUTTYS;
Bondo; This started as the manufactures name and has become a generic term. It requires that you mix it with a cream hardener. The hardener is colored so that you can judge how much hardener was added.
If you add too much hardener, you may not be able to apply it before it kicks. Another problem is that it will be more brittle.
If you add too little hardener, it may never kick.
If you have never played with this stuff before, do several test mixes and keep track of the color.
I tend to use "dynalite" brand and it should be noted that it is not waterproof! If this may cause a problem, I'd recommend "Duraglass".
Glazing Putty; Evercoat has a great glazing putty that mixes like "bondo". What makes this a nice product is that it spreads more smoothly than bondo. It sands a little easier.
Spot Putty; Spot putty air drys and should only be used for filling pin holes or chips in the paint. 3M sells it in three different colors and they all are supposed to work the same. I've had good luck with the standard RED and GREEN, however the BLUE just doesn't seem right.
Tigers Hair; This is more of a fiberglas product than a Polyester filler. It has chopped fiberglass fibers in the mix. One of the problems is that (much like the fiberglas that it is) it's fairly brittle. The stuff is great if building a custom part, but shouldn't be used for normal body repair.
RUST CONVERTERS, POR15;
I have to admit that in the past I considered this type of product in the same light as snake oil. I haven't used POR15 it's self, but have used a product called "Marhide" that I believe to be the same thing.
This stuff is great and really does convert surface rust into an inert paintable material. By saying inert, it means that the converted material can't rust. It would however be possible to chip off the material and allow rusting of the material below.
In order for the stuff to work, it has to be able to get to the rusted area. You should use a wire wheel on a drill motor or wire brush to remove all of the loose flaking rusted metal prior to brushing on the chemical. As it works, it turns black. (as an added note, it will also turn your hands black!)
PRIMERS, AND SEALERS;
You should never spray your paint directly on the bare metal. A primer will help adhesion of the paint to the metal surface.
Should you be painting over an existing painted surface, a "sealer"
should be used to ensure that there is no bleed of the old paint into the
new paint. As an added note, you should never try to paint lacquer over
an enamel (if the enamel was noncatalyzed).
DP90;
There are several "DP" primers manufactured by PPG. The only
difference is in the color with DP90 being black. They all require that
you mix them with DP402 hardener.
K200;
This is a high fill primer that has to be mixed with K201 and is manufactured
by PPG. This stuff is a light mustard color, goes on thick, and is bliss
to sand. Although hard enough to sand after about 2 hours, it;s best to
let it set overnight in order to have it finish shrinking.
PAINTS;
Lacquers; Lacquers are a thing of the past here in L.A. due to the environmental problems. It is a very brittle paint that chips easy. I've used it in the past and one nice thing is that it drys very quickly. Any runs or problems can be sanded out and resprayed in an hour. It does require that the finished product be rubbed out and polished! When you read about somebody rubbing out a lacquer, it's not just for the fun of it!
DXR80; This isn't a paint, but is an additive that is added to enamels as a "Urethane Hardener". It's added to enamel based colored paints and also clears. An enamel mixed with this hardener will have to be sprayed within a few hours.
PPG Delstar; This is the enamel that I normally use. It's an acrylic enamel and I recommend the addition of PPG DXR80. It drys quickly and can be wet sanded the next day.
DURETHANE; This is a Polyurethane paint (and clear) and requires a hardener (DU5 or DU6). A polyurethane paint would be more durable than an enamel and should have a higher gloss. Once mixed, you have several hours to spray it and clean out your spray gun.
Imron; This was popular years ago. I would have to describe it as a rubber based polyurethane. It was originally designed for airplanes that are subjected to extreme temperature changes. It then was used on fleet trucks. The stuff does not chip. Brake fluid will not damage it. If you get a run, you can't sand it out! This stuff is so toxic that when I sprayed it, I breathed off of a scuba tank! You have to clean out your gun when done, or throw the gun away. The left-over paint will bounce like a ball.
TOOLS:
Air Compressor:

This is the compressor that I use. It's the largest that Sears had that wouldl run on 110 voltage. (I didn't want to wire the garage for 220) It has a flow capacity of 9.0 cubic feet per minute. The only tool that it has a problem with is the DA sander.
When looking at compressors, you have to be concerned with the amount of air that it can continue to put out. If the flow capacity isn't adaquate, you will have a drop in pressure and you will have to stop until the tank can refill.
What isn't shown in this photo is that I have a separate regulator and water separator that plugs into the air line.
On any compressor, it is required that you drain the tank periodically in order to remove any moisture caused by condensation. There should always be a drain petcock at the bottom of the tank.
Sanders:
You should always use some form of sanding block. I'll include photos at a latter date, however, they are fairly standard.
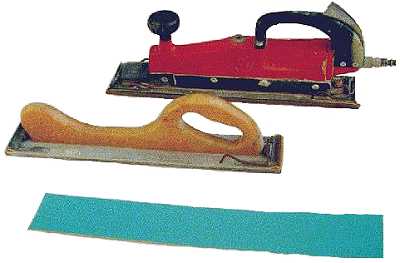
This photo shows an "air file" and also a manual board. They require a special sandpaper that is longer than the normal paper. These are great for getting a large flat area. As far as I know, it's not possible to get a wet-or-dry paper in this size. It is possible to get very fine paper (and also very course)
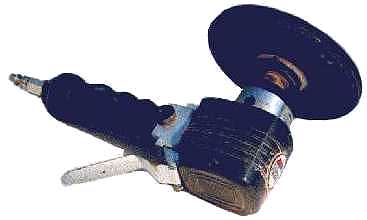
This is a DA, or Dual Action sander. They are good for blocking down an area, however, it's possible to sand in a low spot. They require an excessive amount of air volume and I can't run mine for very long with the compressor that I have. The truth of the matter is that I really don't miss it!
Spray Guns:
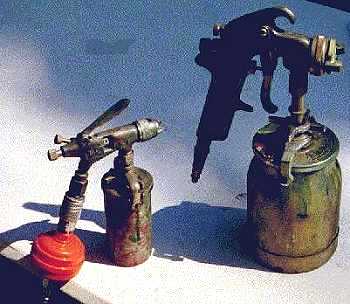
These are the two guns that I use. Both are by DeVelbiss and are professional quality. It's possible for a good painter to use almost any gun and get around a bad spread pattern. (I need all of the help I can get!)
The small gun is normally called a "touch up" gun. It's real handy for spraying small items or door jambs.
The orange item on the end of the small gun is a "throw-away" water separator. It's on a quick disconnect and can be transfered to the large gun. Condensation can (and will) form in the air line between the compressor and the gun.