
|
Tall Spindle Front Disk Brakes
for Chevelles
Authored by Wes Vann, revised March 4, 1999
PLEASE NOTE; Any time working on a raised car, it is mandatory that
jack stands are used. If removing the front suspension, a spring compressor
is required in order for the work to be done safely.
Addendum dated 4/4/00;
Here is the link to Hotchkis Performance
Addendum dated 3/4/99;
The prior addendum was added in an attempt to list further options for locating parts in the junk yards. I ended up getting all sorts of e-mail as a result! I think that it just added more confusion that help.
Global West now has a web site and within it, they list what your options are. Just click on their name in the prior sentence to go there.
I'm voiding out all of the comments that were in the 1/9/99 addendum!
Addendum dated 1/9/1999;
Addendum dated 12/15/97;
Recently I was approached by a company that purchased the stock and rights to the kit that was marketed by HO Racing. As a result, I'm going to go into what it offers and some of the information that I have been able to gather about it. As is the case with most of the pages that I've written, a fair amount of what is said is my opinion.
The HO kit was the first on the market that enabled a person to put the tall spindle set-up on an older Chevelle ("A" body). This was before Global West and Hotchkis started marketing their upper control arms. There were articles written in Hot Rod magazine covering the conversion.
As I understand it, the kit includes upper and lower ball joints. Also included are the tie rod ends. The cost is VERY reasonable in light of what it enables you to do.
The BIG potential problem is that in order to get the desired alignment, a fair amount of shims have to be added at the upper control arm attachment. Keep in mind that the older cars were not really constructed that accurately and as such, the amount of shims vary from car to car. This can lead to clearance problems with headers or the steering column shaft.
This is what I'd recommend before sending away your money;
1. Assume that you will have to buy a Moog offset shaft for the upper control arms.
2. Assume that you will have to add an additional 3/4 inch of shims over what you currently have. Measure the clearance you currently have and then subtract that 3/4 of an inch.
3. You may have to replace the bolts for the upper control arms with longer ones.
4. Headers will make clearance more of a problem.
5. Assume that you may have to do some trimming of the upper arms for clearance.
What it all boils down to is that if you have the clearance to install it, the kit is a good value for the money. I think that the appearance of an inch of shims would tend to bother me (just one of those personal opinions).
The company is called Malibu Performance and their phone number is (818) 222-6725. The owner is Bruce Allison and he can be reached by e-mail at ballison@jetlink.net
Be sure to let Bruce know that you heard about him from this site!
This is being written with my 64 Chevelle (2dr wagon) as the example. It's full of my opinions and may not jive with everybody's ideas of how it should be done.
There are two reasons for going to the tall spindles that were used on the 73 through 75 Chevelles (and other model A bodies). The latter model Chevelles used an 11" rotor, where as the 72's and older used a 10" rotor. By using a special upper control arm, the geometry is updated to a better lay-out.
There is was kit available from H.O. racing that doesn't require the special upper arm, however, in order to adjust the camber into a reasonable setting, an excessive amount of shims have to be added. The added shims can lead to clearance problems with headers. I would also question if the caster can be adjusted to the settings that are obtainable with the special upper arms. I have been told that H.O.. racing has gone out of business.
The special upper arms can be obtained from Hotchkiss or Global West. Both are custom built tubular arms and look great. I went with the Global West set-up due to their using a larger upper ball joint (not really a big thing).
Global offers, and recommends, a solid bushing set-up that they call "del-alum". I chose to use a standard rubber bushing due to concerns of transmitted noise. To be honest, I have driven an El Camino that was set-up with the "del-alum" bushings and didn't notice any noise.
The Global kit included (as I recall); the custom tubular upper arms with ball joint, special lower ball joints (with the body diameter turned so that it will fit into the 64 lower arm), both tie rod ends, and spacers required on the upper control arm cross shaft.
I got the spindles and disks from a 73 Monte Carlo. The parts required were the spindles, rotors, calipers, and dust shields.
While doing the conversion, I replaced all of the bushings, drag link, idler arm, and springs.
For the cross shaft on the upper control arm, I purchased an offset arm from MOOG. Using this arm can help when adjusting the suspension and help keep down the amount of shims required.
When taking the front suspension apart, be extremely careful of the springs! Use a spring compressor to release the loading.
The new ball joints have to be pressed into the control arms. Have a shop do this. Although it is possible to hammer in the rubber bushings, I'd recommend that you also have a shop do this.
This is one area where I had a problem with the Global kit. When you use the rubber bushings with their kit, they provide two spacers (per side) that have to be installed on the cross shaft. They are a different width and the instructions (and I latter called them and they confirmed it) state that the larger spacer goes toward the front of the car. When I tried to adjust the caster, I couldn't get it into the range that should have been possible. I had to take a bushing out (on each side) in order to swap the spacers (you trash the bushing in the process of removing it) front for back. This moves the arm rearward and now the desired setting can be obtained.
I ended up making stainless braided brake lines for the hook-up to the new calipers. If you do this, once the car is back on it's wheels make sure that the line doesn't bind or rub on anything when the wheels are turned full lock to lock.
Assembly of all of the parts is just like a stock car. If in doubt, just get almost any manual.
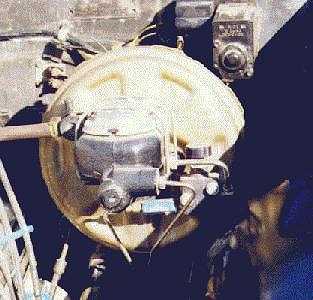
For the master cylinder, I went the dual reservoir power set-up. Keep in mind that in 64, the master cylinder was a single unit. I can't recommend highly enough converting to a dual set-up for safety sake alone. On a disk/drum (or just about any car that I can think of) some form of proportioning the line pressure (front to back) is required. I chose to use an adjustable proportioning valve so that I can play with the system. Referring to the adjustable proportioning valves that are on the market (Wilwood) as "proportioning" valves has always bothered me. What they enable you to do is dial down the pressure in that line.
Should you desire to use a factory proportioning valve, you will have to get one off a car that has similar brakes and also a similar weight distribution front to back.
I used a 2lb residual valve in the line to the rear brakes after the proportioning valve. The reason for this is in order to keep a small amount of pressure in the line to keep the brake shoes close to the drum (keep in mind that some master cylinders have the residual valve in the body and you may want to remove it in order to use the value you are after).
The power booster that I used is for a 67 Chevelle (I believe that the firewall is the same from 64 through 67).
I found the master cylinder by searching for the same piston diameter as the 73. I found one that I believe is from a 69 Camaro. Things to check for are; the piston diameter, bolting to the power booster, and also if the piston has a deep or shallow cup (where the rod that comes out of the booster goes into the cylinder).
The hardest part of this project was the fitting of the hard lines to the front brakes. I chose to do the lines in stainless steel. When I did the lines, the engine wasn't in the car, and I ran the line to the shotgun side along the rear edge of the crossmember. This became a problem when I installed the headers. The brake line just ran too close to the headers, and I had to relocate it.
Other than having to cut short the bolts for the upper control arm cross shaft, there are no clearance problems.
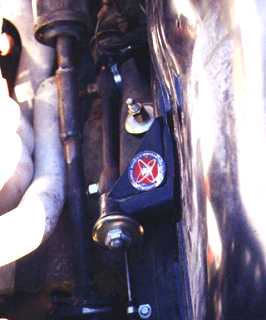
There is one derogatory comment that I have about the Global West set-up. There is a metal bump stop attached to the upper arm that can't be removed. When I asked them about it, they said that the reason was to unsure that the angle on the upper ball joint didn't get over extended. If the car is at the stock height, this bump stop is just too close and would do a metal to metal hit when going over a bump. It seems to me that they could have just made the angle of the ball joint different.
ADDED NOTES AND COMMENTS;
1. Even if the original rims were 15", they may not clear the disk brake caliper. There was a change in the rim profile made when disk brakes became more common. The older 15" drum brake rims will not fit, and 14" rims are out of the question.
tecref2.html