

|
Technical Reference #9
Hanging Doors and Fenders
Authored by Wes Vann, last modified on July 8, 1997
This will outline what I had to do to my 64 Chevelle 2 door wagon.
"fore and aft" is referring to movement towards the front or rear of the car.
"side to side" is referring to movement in towards the body or away from it.
I don't own a body shop and this may not be the quickest way to get good results! I just have a lot of spare time to kill. No special tools were used. You do need two standard bottle jacks.
This isn't an easy job to do and there really aren't a lot of photos that I can show to make it any clearer than just writing what I ended up doing on my car. The results that I got were, as far as I'm concerned, as good as would have come out of the factory.
An added problem I had was that I was putting a 65 front end on a 64 body (and doors). The fenders had never been on the body.
The doors had been removed so that I could rebuild the hinges and paint the jambs. All of the rubber seals were replaced.
Rebuild the hinges or buy new ones! After the years of holding up your doors (and you hanging on them), the hinges don't owe you anything.
Prior to doing any adjustments, I'd recommend that you use a tap to clean out the threads on any of the nut plates. It's also recommended that you very carefully check the threads on any of the bolts that you are planning on using. Clean the bolts with a wire brush!
The hardest thing to get used to while doing this was how everything is interrelated. You can't just do the doors and then the fenders. The fenders have to be hung and adjusted in order to know the needed position of the door. The crease line in the door will be a deciding factor in how high the fender has to be. It's a back and forth function!!
The "factory" gap dimensions can be found in a factory assembly manual. Honestly, I have to think of these as a wish list or maybe starting point. Heck, my car was built more than 33 years ago!
I ended up adjusting the doors at least three times.
In order to explain how all this is done, I have broken it down into doors, then fenders, and then striker pin.
Hinges;
On my 64, I wasn't able to buy new hinges and the ones that were on the car were fairly loose. The detent mechanism was trash on both sides.
What I did was purchase one of the "kits" from Original Parts Group that is for a 68/72. It included the hardened pins and also the bushings. The one problem was that the kit has two of the large diameter bushings. I ended up having to purchase two additional "small" bushings.
On the 64, you need a total of four pins and 8 of the small bushings for both doors.
The old pins get hammered out using a drift punch and a socket supporting the other side of the hinge. The old bushings also get hammered out using the drift punch.
I used "aircraft" brand paint stripper to remove the old paint, primed them with DP90, and then painted them with the same color as the car (to be truthful, it's the color the car WILL be).
Then I carefully hammered in the new bushings.
The new pins had to be cut short so that they matched the old pins length. Then the two hinge parts were put together and the pins driven into place.
Now I just wish that I could find the parts to rebuild the detent mechanism!
Doors;
To start, when adjusting a door, it's best to remove the striker pin. The reason for this is that you don't want the latch supporting the door when checking the adjustment. It should only be supported by the hinges.
Along the lower edge of the door, I placed two layers of masking tape to protect the painted surface. I also made several shims out of composition board. It's also known as illustration board and can be gotten at art supply stores in various thicknesses.
The door hinges are bolted to the body with sliding plates inside the body where they can't be seen. It's at this connection that you can adjust the door fore and aft.
The door hinges are also bolted to the door with sliding plates. This enables you to adjust the door closer or farther away from the body.
One of the problems that I had was that it's near impossible to get to the bolts without removing the fender. I know that there are special wrenches that should work. I also know that a body shop wouldn't spend the time to remove the fender. I chose to remove the fender while adjusting the door.
What I did was support the door on two bottle jacks (with the door just slightly open) and loosen the bolts. I then could pry the hinge in the direction that I wanted. I then tightened the bolts and checked the alignment.
When prying the hinges, I put masking tape on sections of paint stir sticks and held them against the painted surface. This way I wouldn't damage the paint.
Place a strip of illustration board along the lower edge of the door opening to establish that gap. This also protects the paint on the body.
Fenders;
The fenders are adjusted using shims that come in various thicknesses. The shims can be purchased at a body or frame shop. I play with 1/8", 1/16", and 1/32" shims. The ones that I like have a little tang on the end that makes it easier to install them. You buy them by the box and they don't cost much. Heck, if you buy the boxes for the three sizes, they will last you a life time.
There are four points where adjustments are made.
Three of them are at the top rear area of the fender (at the firewall). In order to make it easier to get to these points, it's best to remove the hood hinge. One shim adjustment is for movement fore and aft. Another is for movement up and down of the top edge of the fender. The last of the three is for movement closer or farther from the body.
The last shim adjustment is at the lower edge of the fender adjacent to the door. What this adjustment does is take out or add to the curve of the fender.
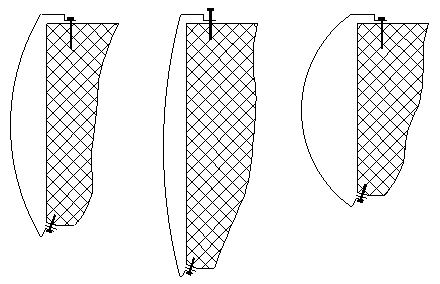
The drawing at the left is the curve that would match the doors curvature. The drawing at the center would be if you added too many shims. Note that there is less curvature. The drawing at the right would be if you didn't add enough shims. Note that there is too much curvature.
Start with all of the fender bolts removed except for the ones where the shims will be added. The front of the fender will rest on the radiator core support.
You have to have the cowl sheet metal that is just in front of the windshield installed and also the body piece that is at the side of the windshield (yes it can be removed on the 64's and I had mine off so that I could check for any hidden rust).
Your first adjustments should be to establish the alignment of the upper rear edge of the fender to the body piece just behind it. You must have a small gap between the cowl piece and the fender. At this point, you may find that the edge of the door doesn't align and as a result the door will have to be moved in or out to match. I told you that it was a back and forth process.
Once these three shim points are set on the fender you can go to the lower shim point. On one of my fenders there was too much curvature to match the door. This may have been due to the handling by the prior owner. In order to take some of the curvature out of the fender, I had to add shims at the lower edge. This pulls the fender straight. I had to have a (large) friend push on the fender at the crease line in order for me to fit the shims and tighten the bolt. If the bolt is loosened, the fender will jump away from the body and resume it's curvature.
Looking at your work;
On 64/5 Chevelles there is a crease in the body at the belt line. This should line up between the fender and door. It should also line up at the rear of the door.
The crease line at the upper edge of the fender should line up with the door.
There should be a uniform gap at all of the edges of the door.
There should be a small gap between the fender and the cowl. There should also be a small gap between the rear upper surface of the fender and the body.
Striker / Latch Pin;
The last thing to do is to reinstall the striker pin. This also screws into a floating plate so that it can be moved around.
What I found is that once the pin is loose enough to move (and not damage the paint) it would just flop around and you would lose any reference to where it was.
What I did was put masking tape at the lower edge of the large washer, and another piece on the side prior to loosening it. This way I had a reference to where it was. I could then move it up the desired amount, tighten it, and retry closing the door.
Keep in mind that the latch shouldn't support the door. When closing the door, it shouldn't move up or down when the latch is engaged!
Good luck and take your time! I did this over the course of several days. I swear by the theory that once I'm pissed off at something, I just walk away and try another day. The results were worth the time.